 USCIS.love
Printing and mailing an O-1/EB-1/EB-2 NIW petition
How to correctly print an O-1, EB-1, or EB-2 NIW petition in Letter format and prepare it for mailing to USCIS.
Author: Alina Kanametova- updated 11 min read
Key answer
Printing and sending the petition is the last step where things can still go wrong, and the only one where a mistake is caught by the processing pipeline, not an officer. The packet you send to USCIS first goes to a mail processing center, not a person. There, it is unsealed, all staples and tabs are removed, and it is run through an industrial scanner. Proper printing is not about appearance but about what will actually reach the officer's screen.
What happens to your packet after mailing
Your envelope does not go straight to a USCIS office, but to a lockbox - a mail processing facility run by a private contractor under a contract with the US Treasury. There are four locations: Chicago, Elgin (Illinois), Phoenix (Arizona), and Lewisville (Texas). Hundreds of contract employees work there, along with only a few from USCIS itself. More than 500,000 applications go through the lockbox each week. Processing happens 24/7, with a target turnaround of 72 hours.
Extraction
Your envelope is opened and its contents are sorted by form type; payment documents are separated for payment processing.
Preparation for scanning
Everything is removed from the packet: staples, paper clips, binders, colored tabs, sticky notes, dividers. Pages are straightened and arranged. Anything smaller than 4 x 6 inches (about 10 x 15 cm) can get lost in the scanner.
Scanning
The entire packet is run through an industrial scanner in black and white or grayscale mode. The output is a single large PDF.
OCR
The OCR system converts the text from forms into electronic fields. That's why legibility is more important than appearance: the better the contrast between black text and a white background, the better the recognition.
Forwarding to officer
The PDF is sent to the USCIS system, where the officer opens a black-and-white file on screen. Paper originals are sent to a service center or destroyed.
The officer doesn't see your paper
All decisions are made based on the electronic copy. Neat binding, thick paper, colored dividers, or paper stock quality do not make it to the officer. Only what is visible on a black-and-white scan reaches them.
How to print your petition for USCIS: color, paper, and format
The most common question before printing is about color. The short answer: color is not required. At a quarterly meeting between USCIS and the immigration attorneys association in September 2023, the agency described the process directly:
"USCIS Lockbox service providers image all scannable documents received from a petitioner, applicant, or requestor in black and white, front and back, and single-sided."
A typical EB-1A or EB-2 NIW petition is 300-500 pages or more. The difference in cost between color and black-and-white printing at this volume is significant, and all of it is wasted.
Separately, USCIS warns that attempts to highlight or correct text will make it unreadable:
"Do not use highlighters, correction fluid, or correction tape. We use both black-and-white and grayscale scanners that will not properly read information that is greyed out, highlighted, or corrected."
USCIS paper and printing requirements come down to three rules.
Letter Size, Not A4
USCIS specifies 8.5 x 11 inch paper, which is 215.9 x 279.4 mm. Standard European A4 is 210 x 297 mm: narrower by 6 mm and longer by 18 mm, so you cannot trim one format to match the other. Get the right size paper in advance; outside the US, it is not available in every store.
One Side Per Page, White Paper
Print on one side of each sheet only. The total number of sheets must match the number of pages in your packet. This rule applies to forms and to scanned exhibits. Use only white paper; the only known exception is the G-28 form (notice of representation), which is printed on blue paper so the lockbox staff can spot it in the stack.
Black Text, Black Ink, No Correction Fluid
Handwritten text must use black ink only. Signatures may be black or dark blue. Highlighters, correction fluid, and correction tape are forbidden. For forms, a monospaced font is recommended because it is better recognized by automated systems. If you make a mistake, reprint the page instead of covering it up.
Highlighter Has the Opposite Effect
On a black-and-white scan, yellow highlights turn into a solid dark block and completely cover the text underneath. Visually, this appears as a redacted fragment. Instead of highlighting, use underlining, bold text, arrows in black ink in the margins, or a direct citation in your cover letter like "See Exhibit B, page 3, paragraph 2".
There are cases when color is actually beneficial or required:
- copies of passports and IDs: a color original provides a sharper black-and-white scan than a copy of a copy
- charts and diagrams: if lines differ only by color, after scanning they will appear equally gray, so use different line styles and labels
- uploading documents to NVC: their rules are the opposite-they require scanning color documents in color
- online filing through the USCIS account: the officer sees the uploaded files exactly as you upload them
Typography of the petition text
The cover letter and the exhibit descriptions are read as scans on a screen, so formatting serves one purpose: the officer must find the fact without reading the whole paragraph.
- A serif font at 12-14 pt; Times New Roman is the variant officers are used to.
- Bold the load-bearing fact inside the sentence, not the whole sentence: "the interview ran in an outlet with 160 million visits a month".
- Bold plus underline - rarely, only for the key point inside an already highlighted passage.
- Italics for quotations from documents and for sub-points; quotations with a wider indent. Italics read poorly in running text.
- The same formatting across all sections and exhibits: the officer compares documents with each other.
How to sign forms so your signature is accepted
Since July 10, 2026, a DHS rule (91 FR 25479, published in the Federal Register on May 11, 2026) has been in effect. Under this rule, USCIS can deny a form and keep the fee if, after acceptance, they later find the signature is invalid. For those printing and signing the packet themselves, this applies directly at the printing stage.
| Signature | Status |
|---|---|
| Printed the form, signed it by hand, sent the original | Valid |
| Scan, copy, or fax of a form with a real signature on paper | Valid |
| Image of a signature inserted into the PDF from another file | Invalid |
| Stamp with a facsimile | Invalid |
| DocuSign or Adobe e-signature on the form itself | Invalid |
| Typed name in the signature field | Invalid |
| Attorney's or translator's signature instead of yours | Invalid |
The full analysis of rule 91 FR 25479 - which signatures are valid, how reject differs from deny, how to sign each form - is in a separate article on signatures on USCIS forms.
The risk is that at intake there's usually no way to tell the difference between a real signature and an inserted image, so it might only be discovered months later. USCIS signature rules are in the Policy Manual, Volume 1, Part B, Chapter 2 and the actual regulation is in the Federal Register.
A signature in the wrong field will get your packet sent back just like a payment error:
We've had cases where someone wrote a check for the fee and put the wrong date on it. They returned the case. In another case, the signature was placed in the wrong spot on the I-140 form, so the case was returned. There are many reasons for a rejection. The packet will be sent back to the mailing address. If you entered a Russian address, the wait can be from a month to forever.
Order and separators: how to assemble your packet
The assembly logic is simple: the packet should be readable from top to bottom without guessing, and navigation should survive scanning.
- Place payment authorization forms on top, then forms, cover letter, table of contents, and only then the supporting evidence in sections
- The order of the pages must match the order in the table of contents and cover letter
- Navigation should be printed on the actual pages: a section title page with the exhibit number, not a label stuck on
- Do not bind the packet tightly-all fasteners will be removed before scanning anyway
- Do not include CDs, DVDs, or flash drives-the lockbox does not process electronic media
- Attach copies of photos and documents smaller than 4 x 6 inches at standard size, otherwise, they may get lost
A clear structure is what matters, not elaborate formatting:
on the envelopes it was written like: i-485 principal applicant, i-131 dependent applicant, and so on. You can actually do without envelopes, but you need clear separation so that, for example, some other form doesn't end up in the middle of the i-140.
If a petition is prepared by a lawyer, they include a G-28. No one expects originals; scans are usually fine.
Check the contents first
Before printing, make sure the petition itself is properly assembled. Details on what a petition package includes are in the article What is a Petition, and the document formatting requirements are in Document Formatting.
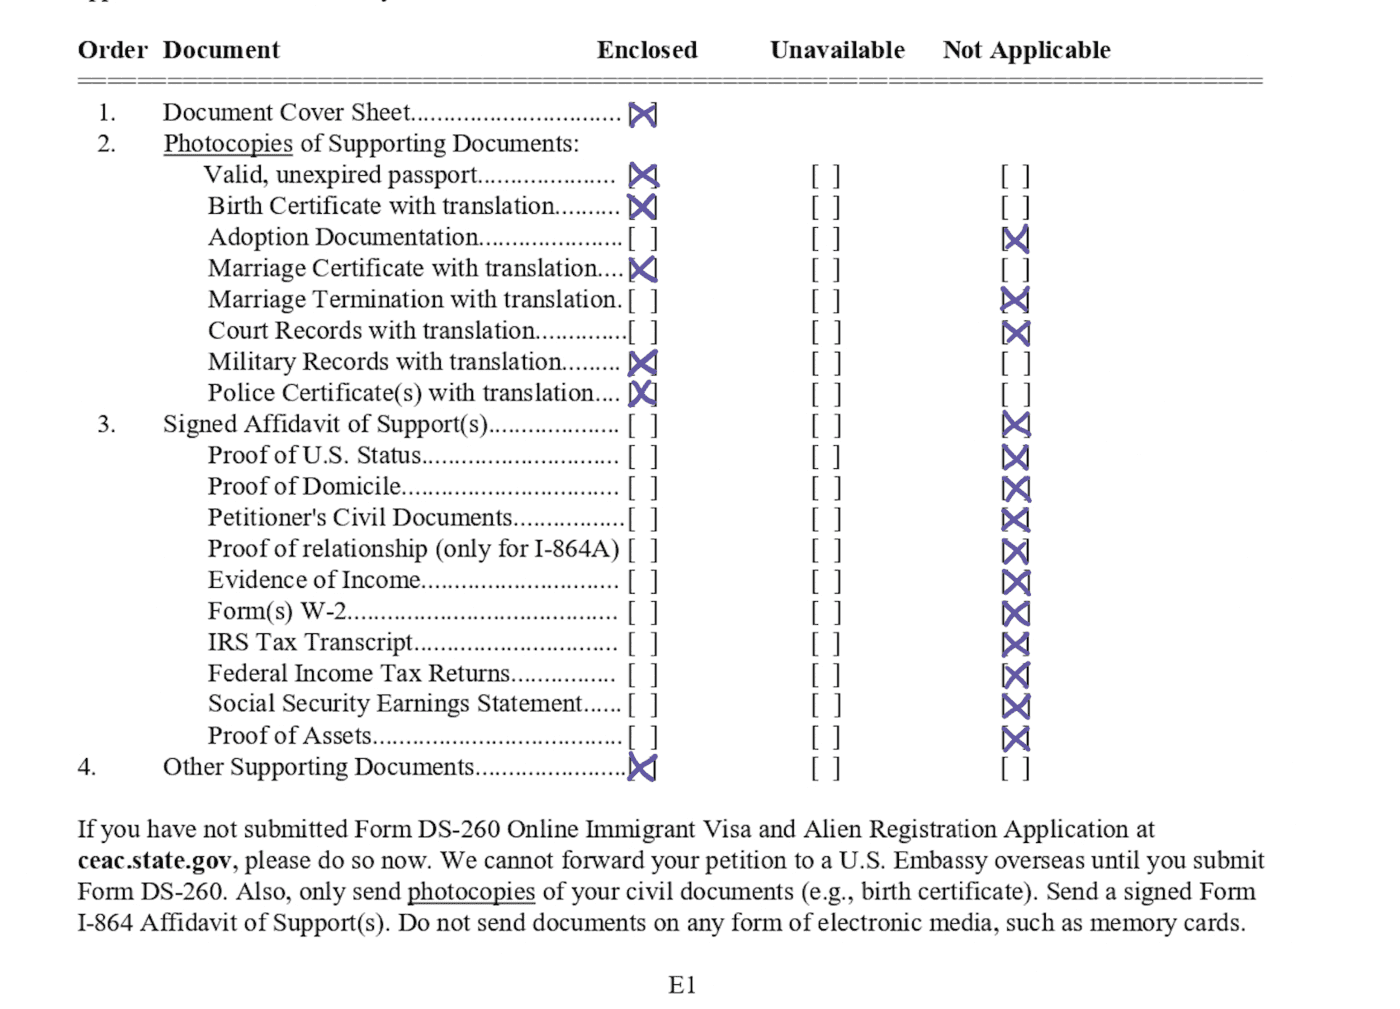
Document Cover Sheet: for each document they mark Enclosed / Unavailable / Not Applicable
Where and how to file a petition with USCIS
The filing address depends on the form, category, and whether you are sending by regular mail or courier. USCIS publishes these addresses on separate pages for each form, and they change from time to time:
Mailing rules:
- use the address only from an official USCIS source for your form and category;
- check whether the addresses for regular mail and courier service match;
- send with tracking and keep the receipt until you get the notice of receipt;
- include form G-1145 if you want to get an electronic notice as soon as your package is received;
- the return address in the petition is where the package is sent back if refused, so using a US address here is much more convenient.
Courier services sometimes have issues with US zip codes, so check this ahead of time:
I sent it via UPS and there was a problem where their system couldn't properly recognize the zip code, and the man understood it was really important to me and said, I think it will get there. But I would recommend using USPS instead; they don't have these problems. I couldn't change it at that point since I'd already written the UPS address on the money orders.
Addresses change
Don't use an address from outdated instructions or forum posts. Check the current filing page on the USCIS website right before you send your package. Where exactly to file your petition and how that depends on your location is explained in Filing Inside and Outside the US.
Printing and Sending the Petition If You're Outside the US
Sending your petition from abroad adds three separate challenges: finding Letter-size paper, paying with a US card or account, and providing a US return address.
- Paper. Letter-size paper is rarely sold in regular stores outside the US. Some applicants solve this by having their package printed in the US through friends or print services.
- Payment. Starting October 28, 2025, money orders are no longer accepted. Only a US bank card or withdrawal from a US account are allowed. Details are in the article Paying USCIS Fees.
- Return address. If you list a non-US address in the forms, getting your package back turns into a lengthy separate wait.
What Happens After You Mail the Petition
Next comes the wait for your case number. According to community observations, typical timeframes are:
| Event | Observed timeframe |
|---|---|
| Case registration after package delivery (I-140 with premium) | about 0-3 days |
| Electronic notice with case number after delivery | next day |
| Paper receipt notice | about 7 days |
| Receipt notice for EB-1 on average | 1-4 weeks or more |
| Online filing instead of paper | 1-3 days |
| Delay after which you should contact the lockbox | about a month |
These are just community observations, not guarantees. Timing varies widely. Some cases reported no tracking number for about 25 days and the receipt notice arrived only after contacting them, another 1-2 weeks later.
After Sending
Once your package is accepted, further processing is done based on your case number. How to track your status is explained in Case Tracking.
Key Points
- The package first goes through mail processing: all clips and tabs are removed and documents are scanned in black and white.
- Color printing is wasted money. The officer only sees a black and white PDF.
- Highlighter on a scan turns into a dark block that hides exactly what you wanted to show.
- Print on 8.5 x 11 inch Letter paper, single-sided, black on white.
- Navigation must be printed on the sheets themselves, not attached. Stickers and tabs won't survive the scanner.
- Sign the forms by hand. Pasted-in image signatures, stamps, or electronic signatures on the forms may cost your fee and queue spot starting July 10, 2026.
- Get the filing address from the latest official USCIS source for your form, use tracked shipping, and keep a US return address if possible.
0 of 7 checked- saved in this browser only
Frequently Asked Questions
Related Materials
What is a Petition
Paying Fees
Document Preparation
Filing Inside and Outside the US
Packet Assembly and Review
Filing Online or on Paper
Case Tracking
O-1 Checklist
This is Not Legal Advice
This material is for general informational purposes and helps you organize your own preparation. It is not legal advice and does not create an attorney-client relationship. US immigration rules change. Always check current USCIS requirements and consult a qualified professional before filing.
Related materials - Prepare and file
- What Makes Up an O-1, EB-1, and EB-2 NIW Petition
- Examples of O-1, EB-1, EB-2 NIW Petitions from Open Sources
- Self-check for an O-1 or EB-1A petition: the RFE checklist
- O-1 Petitioners and Employers: Who Can File?
- O-1 Agent Petition: What It Is and Who Needs It
- Letters of Intent and Documents for the O-1 Agent Model
- Filing an O-1/EB-1/EB-2 petition inside the U.S. or abroad
- Attorney for US O-1/EB-1/EB-2 NIW talent visa: needed?
- Services and contractors for O-1, EB-1 and NIW petitions
- Talent Visa Services Marketplace
- How to Check an Attorney's License Through the State Bar
- US O1/EB1/EB2 talent visa: attorney agreement
- Signatures on USCIS forms from 10 July 2026: what is valid
- Paying USCIS fees: checks, cards, and common mistakes
- What goes into the evidence packet
- What the whole path costs
From community discussions
«I went to an agency, asked them to help write an article - they made such nonsense. If you publish something like that and the officer reads it, they'll understand that such articles have little to do with the applicant's expert field.»
community member · from public community chats
«Definitely respond to the RFE: gather up the references, often it's because of incorrect formatting (in the PDFs you need to make hyperlinks at the bottom of each page). The RFE states point by point what and how needs to be fixed, just go through all of it.»
community member · from public community chats
«At my consulate they nitpicked at the fact that in one place we wrote My Device Inc instead of My Device, when it was about the period when the company wasn't registered yet, and they started pressing that we were thereby misleading them. So they really do look even at such small things.»
Ksenia · from public community chats
Personal opinions of community members from public discussions, not legal advice.
Did this answer help?
Open database - you can improve it
Found something off, or know what to add? Select text and hit "Suggest an edit", or propose an article/topic below.